An open show powered by community LINUX Unplugged takes the best attributes of open collaboration and turns it into a weekly show about Linux.
…
continue reading
Innhold levert av HPR Volunteer and Hacker Public Radio. Alt podcastinnhold, inkludert episoder, grafikk og podcastbeskrivelser, lastes opp og leveres direkte av HPR Volunteer and Hacker Public Radio eller deres podcastplattformpartner. Hvis du tror at noen bruker det opphavsrettsbeskyttede verket ditt uten din tillatelse, kan du følge prosessen skissert her https://no.player.fm/legal.
Lik Hacker Public Radio
Show notes are at https://stevelitchfield.com/sshow/chat.html
…
continue reading
Android Backstage, a podcast by and for Android developers. Hosted by developers from the Android engineering team, this show covers topics of interest to Android programmers, with in-depth discussions and interviews with engineers on the Android team at Google. Subscribe to Android Developers YouTube → https://goo.gle/AndroidDevs
…
continue reading
Daily update on current cyber security threats
…
continue reading
1
Defensive Security Podcast - Malware, Hacking, Cyber Security & Infosec
Jerry Bell and Andrew Kalat
Defensive Security is a weekly information security podcast which reviews recent high profile cyber security breaches, data breaches, malware infections and intrusions to identify lessons that we can learn and apply to the organizations we protect.
…
continue reading
On The Bike Shed, hosts Joël Quenneville and Stephanie Minn discuss development experiences and challenges at thoughtbot with Ruby, Rails, JavaScript, and whatever else is drawing their attention, admiration, or ire this week.
…
continue reading
From smart phones to smart homes, the Android Police Podcast gives you exactly what you need from a tech podcast - no more, no less. Every week, each of our hosts curate topics to talk about. It could be tracking through your newsfeed or a passion project or two. We're centered on Android, but go far and wide, so if you're looking for good talk that won't waste your time, listen and subscribe.
…
continue reading
Three nerds discussing tech, Apple, programming, and loosely related matters.
…
continue reading
Welcome to the Security Weekly Podcast Network, your all-in-one source for the latest in cybersecurity! This feed features a diverse lineup of shows, including Application Security Weekly, Business Security Weekly, Paul's Security Weekly, Enterprise Security Weekly, and Security Weekly News. Whether you're a cybersecurity professional, business leader, or tech enthusiast, we cover all angles of the cybersecurity landscape. Tune in for in-depth panel discussions, expert guest interviews, and ...
…
continue reading
Every Friday and Sunday, Slate’s popular daily news podcast What Next brings you TBD, a clear-eyed look into the future. From fake news to fake meat, algorithms to augmented reality, Lizzie O’Leary is your guide to the tech industry and the world it’s creating for us to live in.
…
continue reading
Player FM - Podcast-app
Gå frakoblet med Player FM -appen!
Gå frakoblet med Player FM -appen!

))
HPR4212: Replacing backup batteries in my Kenwood TS940S HF Radio Part 4
Manage episode 441517650 series 62200
Innhold levert av HPR Volunteer and Hacker Public Radio. Alt podcastinnhold, inkludert episoder, grafikk og podcastbeskrivelser, lastes opp og leveres direkte av HPR Volunteer and Hacker Public Radio eller deres podcastplattformpartner. Hvis du tror at noen bruker det opphavsrettsbeskyttede verket ditt uten din tillatelse, kan du følge prosessen skissert her https://no.player.fm/legal.
I mention the acronym PLL which stands for Phase Locked Loop. Here is a Wikipedia article about PLL.
Picture 1
shows a top down view of the radio. The large black square section located at the front left of the picture contains the speaker left and control board right. With the top cover fitted the control board is accessible via s sliding cover. Both the speaker and control board need to be removed in order to get access to the PLL backup battery. Both come out as one piece.
Picture 2
shows the first three connectors that need removing from the control board. All six connectors need removing before lifting the control board and speaker.
Picture 3
shows the second three connectors that need removing from the control board. Notice they are marked with the letter F.
Picture 4
shows one of the connectors removed. I was nervous removing these. Fortunately I was able to remove them without causing any damage.
Picture 5
shows the speaker and control board lifted out of place and swiveled to the side to reveal the PLL unit which is encased in a metal box for screening. There are eight screws on the top lid that need removing to gain access to the inside of the screened PLL unit.
Picture 6
shows the top cover removed from the screened PLL unit revealing the backup battery located in the middle of the picture (Silver disc with orange outer rim). The top cover is swiveled to the left hand side out of the way.
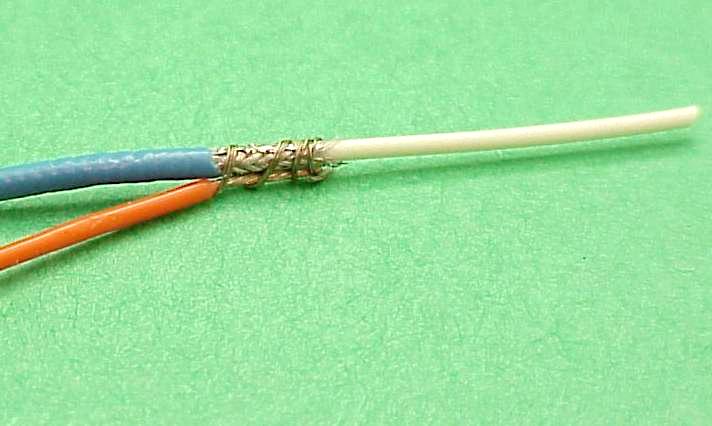
Picture 7
shows a close up of the PLL backup battery. From the picture droplets of liquid can clearly be seen on the right hand connecting terminal indicating that the battery is leaking and must be removed before damage occurs. On the right hand side of the picture notice the two connectors attached to the circuit board that are terminated with unused sockets. I have no idea what these sockets are used for. There are brass pillars either side of the connectors. I assume some sort of add on board could be purchased and perhaps this is what the unused connectors are for. I also mention an unpopulated IC socket that can be seen in the top left hand side of the picture. This is probably for another optional extra.
79 episoder
Manage episode 441517650 series 62200
Innhold levert av HPR Volunteer and Hacker Public Radio. Alt podcastinnhold, inkludert episoder, grafikk og podcastbeskrivelser, lastes opp og leveres direkte av HPR Volunteer and Hacker Public Radio eller deres podcastplattformpartner. Hvis du tror at noen bruker det opphavsrettsbeskyttede verket ditt uten din tillatelse, kan du følge prosessen skissert her https://no.player.fm/legal.
I mention the acronym PLL which stands for Phase Locked Loop. Here is a Wikipedia article about PLL.
Picture 1
shows a top down view of the radio. The large black square section located at the front left of the picture contains the speaker left and control board right. With the top cover fitted the control board is accessible via s sliding cover. Both the speaker and control board need to be removed in order to get access to the PLL backup battery. Both come out as one piece.
Picture 2
shows the first three connectors that need removing from the control board. All six connectors need removing before lifting the control board and speaker.
Picture 3
shows the second three connectors that need removing from the control board. Notice they are marked with the letter F.
Picture 4
shows one of the connectors removed. I was nervous removing these. Fortunately I was able to remove them without causing any damage.
Picture 5
shows the speaker and control board lifted out of place and swiveled to the side to reveal the PLL unit which is encased in a metal box for screening. There are eight screws on the top lid that need removing to gain access to the inside of the screened PLL unit.
Picture 6
shows the top cover removed from the screened PLL unit revealing the backup battery located in the middle of the picture (Silver disc with orange outer rim). The top cover is swiveled to the left hand side out of the way.
Picture 7
shows a close up of the PLL backup battery. From the picture droplets of liquid can clearly be seen on the right hand connecting terminal indicating that the battery is leaking and must be removed before damage occurs. On the right hand side of the picture notice the two connectors attached to the circuit board that are terminated with unused sockets. I have no idea what these sockets are used for. There are brass pillars either side of the connectors. I assume some sort of add on board could be purchased and perhaps this is what the unused connectors are for. I also mention an unpopulated IC socket that can be seen in the top left hand side of the picture. This is probably for another optional extra.
79 episoder
Alle episoder
×Velkommen til Player FM!
Player FM scanner netter for høykvalitets podcaster som du kan nyte nå. Det er den beste podcastappen og fungerer på Android, iPhone og internett. Registrer deg for å synkronisere abonnement på flere enheter.
Lik Hacker Public Radio
An open show powered by community LINUX Unplugged takes the best attributes of open collaboration and turns it into a weekly show about Linux.
…
continue reading
Show notes are at https://stevelitchfield.com/sshow/chat.html
…
continue reading
Android Backstage, a podcast by and for Android developers. Hosted by developers from the Android engineering team, this show covers topics of interest to Android programmers, with in-depth discussions and interviews with engineers on the Android team at Google. Subscribe to Android Developers YouTube → https://goo.gle/AndroidDevs
…
continue reading
Daily update on current cyber security threats
…
continue reading
1
Defensive Security Podcast - Malware, Hacking, Cyber Security & Infosec
Jerry Bell and Andrew Kalat
Defensive Security is a weekly information security podcast which reviews recent high profile cyber security breaches, data breaches, malware infections and intrusions to identify lessons that we can learn and apply to the organizations we protect.
…
continue reading
On The Bike Shed, hosts Joël Quenneville and Stephanie Minn discuss development experiences and challenges at thoughtbot with Ruby, Rails, JavaScript, and whatever else is drawing their attention, admiration, or ire this week.
…
continue reading
From smart phones to smart homes, the Android Police Podcast gives you exactly what you need from a tech podcast - no more, no less. Every week, each of our hosts curate topics to talk about. It could be tracking through your newsfeed or a passion project or two. We're centered on Android, but go far and wide, so if you're looking for good talk that won't waste your time, listen and subscribe.
…
continue reading
Three nerds discussing tech, Apple, programming, and loosely related matters.
…
continue reading
Welcome to the Security Weekly Podcast Network, your all-in-one source for the latest in cybersecurity! This feed features a diverse lineup of shows, including Application Security Weekly, Business Security Weekly, Paul's Security Weekly, Enterprise Security Weekly, and Security Weekly News. Whether you're a cybersecurity professional, business leader, or tech enthusiast, we cover all angles of the cybersecurity landscape. Tune in for in-depth panel discussions, expert guest interviews, and ...
…
continue reading
Every Friday and Sunday, Slate’s popular daily news podcast What Next brings you TBD, a clear-eyed look into the future. From fake news to fake meat, algorithms to augmented reality, Lizzie O’Leary is your guide to the tech industry and the world it’s creating for us to live in.
…
continue reading
Player FM - Podcast-app
Gå frakoblet med Player FM -appen!
Gå frakoblet med Player FM -appen!


